Control flow optimisations - Sorting data is faster in SQL server than in SSIS. - Perform tasks in parallel if possible. If there is too much in parallel has the opposite effect so make sure matches available memory. Data Flow performance optimisations Most performance issues are related to the data flow. As with control flow think if transformations in SQL or SSIS will be faster. You should maximise the flow rate to get data to the destination as quickly as possible. There are some important memory buffer properties
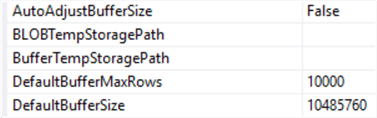
DefaultBufferMaxRows: This is by default set to 10,000, which was made a good setting in 2005. Today we have more power in our machines, so you can set this to a higher number. Too large a buffer will take a while to fill and will make the destination sit idle, so you need to find a good optimum. 50,000 rows is a good start.
DefaultBufferSize: This is by default 10MB which is again quite small. You can bump this up to 50MB or even more.
The actual buffer size will be determined by which of the two properties is reached first. You can set AutoAdjustBufferSize to True to make sure that the specified number of rows in DefaultBufferMaxRows is always met.
SSIS Reading Data Performance Optimizations
Some guidelines:
Don’t use the dropdown box to select the source table. Write a SQL statement and include filtering, grouping and sorting in the SQL code.
Only select columns you actually need.
Keep the data types of the columns small. The more rows you can fit in a single memory buffer, the better.
SSIS Transforming Data Performance Optimizations
Here we have some best practices as well:
Don’t use blocking transformations (e.g. sort and aggregate component). They read all data in memory before even sending one single row to the output. Asynchronous transformations are to be avoided as well since they modify the memory buffer. You can find a good overview in this blog post.
Avoid the Slowly Changing Dimension Wizard. It uses the OLE DB Command, which executes SQL statements row-by-row, which is slow and results in excessive logging.
Don’t use the OLE DB Command, as stated in the previous point.
SSIS Writing Data Performance Optimizations
Writing data is typically the slowest part of the process. Here are some tips to optimize the process:
The OLE DB Destination is the fastest adaptor for SQL Server at the moment. If you use the Fast Load option of course.
Make sure you use a table lock (which is enabled by default).
To speed up inserts, you can disable constraints and drop and recreate indexes.
Try to go for minimally-logged inserts, which means the destination needs to be in Simple recovery mode. It’s a broad topic, but you can find more info in the Data Loading Performance Guide.
Make sure the database files have an appropriate size. Time is lost when the database has to be constantly growing its files.
Additional tips
1. Develop a framework
A whole book could be written about this topic, so I’ll try to keep it short. In order to develop an enterprise-ready efficient ETL solution, a framework for developing SSIS should be present. This framework includes the following parts:
A logging and event handling framework.
The use of templates.
A deployment strategy.
The use of source control.
Logging and event handling
The standard built-in logging provided by SSIS is adequate to find more information about the start and end times of the packages and to troubleshoot packages using logged warnings and errors. However, it still has it shortcomings: not every error is properly logged and it is very hard to retrieve crucial information, such as, how many rows are written to the destination. It is possible to retrieve the number of rows written using the standard logging, but you’d have to enable certain events in the logging which lead to a substantial amount of logging. Furthermore, the queries to extract the needed information are usually fairly complex.
To work around these limitations, you can implement your own custom logging mechanism. Using Execute SQL Tasks you can write information about the status of the package to a central logging database. There are a number of system variables which can give you essential information, such as the package name, the package/task start time, etc.
Typically, such a logging framework would do the following tasks:
Log the start and end of the package using Execute SQL Tasks on the control flow.
Log the start of a task using an OnPreExecute event handler.
Log the end of a task using an OnPostExecute event handler.
Log the numbers of rows transferred. You can use the rowcount transformation to store this number into a variable. Use the OnPostExecute event handler to write the info to the database.
Log errors to the database using an OnError event handler.
The introduction of the SSIS catalog in SQL Server 2012 makes such a framework largely redundant, but in order to get the maximum information out of the catalog, the logging level should be set to Verbose, which gives quite some overhead.
Templates
In order to promote re-use, you could develop templates for packages that are commonly developed. Typically, you would already include the logging components of the logging framework described in the previous section. These templates can be used in Visual Studio as the starting point for the development of new packages: Save a Package as a Package Template.
Deployment strategy
Deploying packages manually to a production server should, of course, be avoided. Therefore, deployment scripts should be created that allow someone with the appropriate permissions to deploy SSIS packages or projects to a server. The following two articles describe all the various possibilities: SSIS deployments and SSIS Deployments with SQL Server 2012. For automating deployments of packages developed in SQL Server 2005, 2008 or 2008R2, dtutil is recommended.
Aside from getting packages and project on a server, it is also important to put configurations in the picture. After deployment, values inside the package need to be altered to reflect the new environment. After all, you don’t want to update your development server when the package is running in production. My personal choice is to use SQL Server configuration tables, but XML configuration files are just as good.
There’s a great chance the package will be scheduled to be executed after its deployment, probably with SQL Server Agent. Make sure that the account executing the package has the necessary permissions to execute every single task inside the package. For SQL Server Agent, proxies can be used.
Source control
Unless you like losing all your hard work after a hard drive crash, you check-in your code into some sort of source control. This will also prevent your work from being overwritten by an over enthusiastic colleague. Due to the nature of the XML behind the SSIS package, it is very difficult to merge packages, so I advise that only one developer works at a single package at a time. Most source control software can check-in and check-out object, but my personal favorite is Team Foundation Server, due to its great integration with Visual Studio.
2. Use BIDSHelper
BIDSHelper is a free add-in for Visual Studio which can be downloaded from Codeplex and it is an absolute must-have. BIDSHelper is available for all versions of SSIS. It has several useful features: such as one-click deployment to a server (great for deploying packages to a test server), visually indicating if a variable or connection manager is configured by an expression or package configuration, allowing the use of relative paths for configuration, visualizing the package performance and so on.
With the introduction of SSIS 2012, some of the BIDSHelper functionality was incorporated into the main product. However, it still remains an invaluable tool, especially because it includes the BIML engine. This engine allows developers to dynamically create SSIS packages based on metadata. For more information about BIML: Stairway to BIML.
3. Avoid blocking components
The components used inside the data flow can be divided in two groups:
Synchronous components. They are also called row transformations and each input row corresponds exactly with one output row. These components can reuse buffers and do not require data to be copied between buffers, making them the fastest components in SSIS. Examples are the derived column, the conditional split and the data conversion components.
Asynchronous components. When a component has to acquire multiple buffers before it can process rows, or when multiple inputs have to be combined or when there is no one-to-one mapping between the input rows and the output rows, we are talking about asynchronous transformations.
The asynchronous components affect the performance of the SSIS package. They can be split up in two types: partially blocking and full blocking transformations. When datasets need to be combined, such as in the UNION ALL or the MERGE JOIN, we have a partially blocking transformation.
Some components however need to read the entire dataset before a single output row can be created. These are the blocking transformations. Examples are the SORT and AGGREGATE transformation. These transformations have a devastating impact on the performance. If you want to sort 10 million rows, you’d need to read them all into memory.
To avoid blocking transformations, it’s advised to do sorting and grouping in the source query with GROUP BY and ORDER BY clauses, if applicable. The database engine is much better suited to do these kinds of operations. If the source is not a relational database, it might be an option to write the data to a staging table and do the transformations there. TIPS
Tip #1: Control Design Time Validation
When you open an SSIS package in BIDS, SSIS Designer tries to connect to the defined data sources and verify the metadata associated with those data sources. If the data sources are unavailable, the database objects are locked, or the connect times are slow, you might have to wait an inordinate amount of time for the validation to complete or to learn that the validation failed. This can be particularly annoying if you have to reopen your packages often.
You can also run into validation problems if you try to add a component that relies on a database object not yet created. For example, suppose a control flow includes an Execute SQL task that creates a table. If you add a Data Flow task that populates the table with data, you'll receive a validation warning because SSIS can't validate the table -- it doesn't yet exist. And if you try to run the package, you'll receive a validation error.
Fortunately, SSIS lets you override the default behavior by allowing you to work offline or to configure properties that affect validation. To work offline, you simply enable the Work Offline option on the SSIS menu. You can access this option while you're working on the package or before you open it. (To do the latter, a different BIDS solution must be open so that the SSIS menu is displayed.) When you're ready for your package to be back online, you just disable the Work Offline option, and SSIS Designer returns to its default behavior.
The second method you can use to override the default validation behavior is to set one of the two validation-related properties in your package. First, you can set the DelayValidation property to True for a specific task. For instance, Figure 1 shows the property set to True for a Data Flow task. After you've configured the property, you can work with the task and run your package without receiving those validation warnings or errors.
Figure 1: Setting the DelayValidation Property on a Data Flow Task
Note, however, that the DelayValidation property is available only in executables (e.g., Control Flow tasks, the package itself). The property isn't available in data flow components. If you want to change the behavior of a specific data flow component, you must set its ValidateExternalMetadata property to False. Figure 2 shows the property set to False for an OLE DB Source component in the data flow.
Figure 2: Setting the ValidateExternalMetadata Property on an OLE DB Source Component
Setting the ValidateExternalMetadata property to False provides more granular control over your data flow than setting the DelayValidation property to True. However, when the ValidateExternalMetadata property is set to True (the default), it helps avoid locking issues when your package uses transactions. For this reason, you might want to stick with using DelayValidation at the task level, unless you have some overriding need to work at the component level.
Tip #2: Create a Package Template
Although creating a template in BIDS is relatively simple, it's not particularly intuitive how you go about doing it. Basically, you create a package in SSIS Designer as you would any other package, although you should give it a name that makes it easily recognizable as a template, such as SsisPkgTemplate.
After you've added the components that you want to include in the template, save and close the package. Then go to the Windows Explorer folder where you store your SSIS project files and copy the template package you just created to the BIDS template folder. The location of the template folder can vary depending on the OS, whether you're working in a 32-bit or 64-bit environment, and whether you've installed BIDS or Visual Studio in its default location. On my system, I'm running 64-bit versions of Windows 7 and SQL Server 2008 R2, both installed on the C drive, with BIDS installed in its default location. As a result, the location of my template folder is C:\Program Files\Microsoft Visual Studio 9.0\Common7\IDE\PrivateAssemblies\ProjectItems\DataTransformationProject\DataTransformationItems.
After you copy your template package to the BIDS template folder, you can start using the template to create packages. In Solution Explorer, right-click the project name, point to Add, and click New Item. When the Add New Item dialog box appears, select the name of the template you just created, provide a name for the new package, and click Add.
After you create the new package, you need to generate a unique ID for it. To do so, locate the package's ID property, click the down arrow in the property value text box, then click Generate New ID. At this point, the new package will already include the components in the template. If needed, you can add more components.
Tip #3: Implement Package Configurations
When an SSIS package is moved to a new environment, the data source connections in the package often need to be updated. For example, if you develop an SSIS package using a test database as the data source, you need to update the data source connection so that it points to the production database when you deploy the package.
One way of performing the necessary updates is to manually open the package, modify the applicable property values (such as the SQL Server instance), and redeploy the package. Another method is to use package configurations that automatically supply those values to the package. Although the latter is the preferable approach, it's often not implemented.
Package configurations are easy to set up and modify, which makes supporting changing property values a lot simpler than modifying packages directly. A package configuration is a stored property value that can be updated outside of the package. If the package has been configured to reference package configurations, the package looks for the configurations at runtime, then applies the defined values to the applicable properties. You can modify the package configurations as often as you like, without having to open the package, and the package will use the most current values that have been defined.
Package configurations are useful not only for storing data source information but also for any situation in which property values might change. For instance, you might want to change the value of a variable that's used in an expression in a Script task or Execute SQL task.
To use package configurations, you must enable them on each package for which you want to implement them. With the package open, select the Package Configurations option from the SSIS menu. This launches the Package Configurations Organizer shown in Figure 3. To enable package configurations, select the Enable package configurations option.
Figure 3: Enabling Package Configurations in the Package Configurations Organizer
Next, you need to add the package configurations. To do so, click the Add button to launch the Package Configuration Wizard. When the wizard appears, click Next to skip the Welcome page and go to the Select Configuration Type page shown in Figure 4.
Figure 4: Selecting the Type of Configuration in the Package Configuration Wizard
On the Select Configuration Type page, select one of the following five types of package configurations from the Configuration type drop-down list:
XML configuration file. You can use an XML configuration file to store one or more property values for one or more packages. You can have the wizard generate a new XML configuration file for the current package's property values or add the package's property values to an existing XML configuration file. Either way, you need only select the properties you want to include. The wizard will then write the properties' current values to the XML configuration file.
Environment variable. You can use an environment variable to store the value of a package property. You can associate this type of configuration with only one property, so you need to create an environment variable for each property you want to update. (Unlike the XML configuration file, the environment variable isn't created for you by the wizard. You must create it yourself.)
Registry entry. You can use a registry entry to store the value of a package property. The key must exist under the registry hive HKEY_CURRENT_USER. You can associate this type of configuration with only one property, so you must create a registry entry for each property you want to update. (The wizard doesn't create the registry entry for you. You must create it yourself.)
Parent package variable. Within a child package, you can use a variable that exists in the parent package to store the property value you want to pass to the child package. As with environment variables and registry entries, you must specify a variable for each property you want the parent package to update.
SQL Server. You can use a SQL Server table to store one or more property values for one or more packages. The table must include columns for the property value, the SSIS data type associated with that value, the path that points to the property, and a configuration filter that specifies which package configuration the row is associated with. The wizard can create the table for you, or you can create it before running the wizard. In either case, you must specify the connection manager that the package should use to connect to the database where the table will be located. As with the XML configuration file, you must also select the properties you want to include. The wizard will then write the properties' current values to the table.
After you select the package configuration type, follow the steps in the Package Configuration Wizard to finish creating the package configuration. You can then update the package configuration as necessary in order to pass in the correct property value at runtime.
Note that you're not limited to one configuration type. You can combine types or use more than one type. If you plan to update only one or two properties at runtime, you might find that an environment variable or registry entry is the easiest way to go. For multiple properties, using an XML configuration file or SQL Server table might be a better solution.
You also want to take into account security issues when determining the best solution for your environment. For instance, an XML configuration file might not provide the security you need. A SQL Server database might provide a more secure environment than a file share that's out of your control. However, you'd have to make sure that the SQL Server instance would always be available when needed.
Tip #4: Remove Leading and Trailing Spaces
When developing the data flow of an SSIS package, you might be unaware that the source data is padded with spaces until you try to run your package and problems appear. For instance, suppose your package retrieves string values from a comma-separated value (CSV) file, then uses a Lookup transformation to compare those values. You might not know that many of the string values have spaces before or after them until a lot of comparisons evaluate to False during runtime. Because the Lookup transformation is space-sensitive, "book" doesn't equal "book ", even though they appear to be the same value.
Extra spaces can also be a problem if you're trying to insert data into a column configured with a character data type and the data type's length is too small to accommodate the source value and its spaces. For instance, you can insert the value "one two three" into a VARCHAR(15) column but not the value "one two three ". As a result, when you're retrieving data that might include extra spaces, you might need to remove those spaces, no matter whether the data is coming from text files, columns configured with the CHAR data type, or another type of data source.
If you're retrieving data from a database, you can include the logic to remove spaces in your T-SQL code. For instance, the Production.Document table in the AdventureWorks2008R2 database includes the Revision column, which is defined with the NCHAR(5) data type. To remove the extra spaces, you can use a T-SQL statement similar to the following one in your OLE DB Source component:
SELECT Title, FileName, RTRIM(Revision) AS Revision
FROM Production.Document
This statement uses the RTRIM function to remove any trailing spaces from the Revision values. If you want to remove leading spaces as well, you can modify the statement to include the LTRIM function:
SELECT Title, FileName, LTRIM(RTRIM(Revision)) AS Revision
FROM Production.Document
Now when the Revision values are passed down the data paths, they won't include extra spaces.
You can take this approach only if your source is a database. If it's a text file or some other source that you have less control over, you can add a Derived Column transformation to the data flow and trim the extra spaces there. Figure 5 shows how to trim spaces from the Revision values in the Derived Column Transformation Editor. As the figure shows, you can create a simple expression that uses the TRIM function to trim both leading and trailing spaces. The rest of the data flow can then use the derived column in place of the original Revision column in order to work with data that contains no leading or trailing spaces.
Figure 5: Creating a Derived Column to Trim Spaces
Tip #5: Run Packages with the 32-Bit Runtime
If you're working with a 64-bit version of SSIS and BIDS, you might come across limitations in some of the features available in the development environment. For example, suppose you set a breakpoint within the C# code of a Script task. If you run the package in debugging mode, the package will pause at all the breakpoints you set outside of the Script task, but not at the breakpoint within the Script task. An examination of the Progress tab in SSIS Designer will reveal a warning message that indicates Script tasks can't be debugged while running under the 64-bit version of the SSIS runtime.
The problem is that some SSIS features don't work properly under the 64-bit version of the SSIS runtime. If you want to use those features, you must configure the project to load the 32-bit environment. To do so, right-click the package in Solution Explorer and click Properties to open the properties for that package. Then, in the Property Pages dialog box, navigate to the Debugging page and set the Run64BitRuntime property to False, as Figure 6 shows.
Figure 6: Setting the Run64BitRuntime Property to False
By setting the Run64BitRuntime property to False, you're specifying that packages in the project should start in the 32-bit runtime rather than the 64-bit runtime. Note, however, this applies only to the BIDS environment. To run a package as 32-bit outside of BIDS, you have to take specific steps when you execute the package. For example, if you create a SQL Server Agent job to run the package, you should specify that the 32-bit runtime be used.
Keep Your Development Efforts Moving Forward
In addition to the five tips mentioned here, there are many other considerations to take into account when developing an SSIS package. Even so, knowing how to open packages without validation, create templates, use package configurations, handle leading and trailing spaces, and run your packages with the 32-bit runtime can, in the long run, save you time developing and troubleshooting your packages. That's not to say each of these tips carries the same weight or that they all apply to your circumstances, but at least some of them should prove useful in your development efforts. For any of the tips that do apply, be sure to check out SQL Server Books Online (BOL) for more information.
Page Density Optimize Row Size: SQL Server 2005 (and later) supports 8K columns. This means a row can be, well, over 80K. Does this make sense? Ah, not usually. Managing row size is as important as ever to those interested in efficiency. The trick to good performance and good use of space is to make sure that when the 8K page is filled with rows, there is little wasted space. This means that if the row size is over (about) 4K, only one row will fit on a page and (about) 4K of space is wasted on the page. A secondary problem is that the number of index pages also has to increase to address the pages. Filtered Indexes New for SQL Server 2008, permit you to add a WHERE clause to an index, thus focusing the index on the most important rows e.g. CREATE NONCLUSTERED INDEX FIBillOfMaterialsWithEndDate
ON Production.BillOfMaterials (ComponentID, StartDate)
WHERE EndDate IS NOT NULL ; The filtered index above is valid for the following query. You can display the query execution plan to determine if the query optimizer used the filtered index. SELECT ProductAssemblyID, ComponentID, StartDate
FROM Production.BillOfMaterials
WHERE EndDate IS NOT NULL
AND ComponentID = 5
AND StartDate > '01/01/2008' ; Selectivity When the query optimizer (QO) studies your SQL, the degree of selectivity determines if an index should be used to perform the operation. By processing the Statistics (or "stats") for an index (and an index can have from one to many (many) sets of stats), the QO can determine the selectivity. Basically, it's weighing the choice of using the index to walk through the selected rows or doing a table scan. The example Kimberly used made it pretty clear how it worked but we were surprised to learn: "When the number of rows (selected by the query) is around 1/4 of the number of data pages in the table, the index was not useful and it is more efficient to perform a table scan to fetch the rows selected. This often turns out to be less than 5% of the rows in the table..."
1. SQL Server tracks incidents in the form of wait statistics (see the CAT white paper) You can use this. E.g. page_IO_latch issue, you can be pretty sure that your bottleneck has to do with I/O. And, if you see many LCK_XX type waits occur, you're seeing a blocking issue. In this case, you would spend your time more wisely by investigating the cause of the blockage instead of by looking at the I/O issues. 2. Locate I/O bottlenecks
Check whether you see high page_IO_latch waits or log_write waits in your wait statistics.
Use the DMF sys.dm_io_virtual_file_stats() to locate any areas in which you have excessive physical I/O or excessive stalls on that I/O. These issues can occur at the database level or even at the file level.
Use the trusty PerfMon counters. At a minimum, use the Avg. Disk sec/Read and Avg. Disk sec/Write counters to see the latency of the reads and writes. On an OLTP system, you would, ideally, want to see log file latency to be just a few ms and data file latency to be less than 10ms. Remember that these are ideal values. Your system might tolerate larger latency and still be fine. Also keep in mind that many times when you find that the storage subsystem can't keep up with the current demand, the cause might not be an I/O bottleneck at all. It might, instead, be pooled.
When you find that you have many physical I/O bottlenecks occurring, your first instinct should be to find the queries that are causing all the physical I/O, and then try to tune them before you add more hardware. One performance aspect that you should never ignore is high latency for log writes. If you start to hold up the writing to the log file, all further DML operations can quickly become impeded, and they’ll remain so until you alleviate the bottleneck. High latency in log writes is a sure way to hinder performance in the database. For a better understanding of storage issues and I/O subsystems in a SQL Server environment, I recommend that you read the Microsoft articles "Storage Top 10 Practices" and "SQL Server Best Practices Article."
3. Identify slow running queries using the following:
SELECT
COALESCE(DB_NAME(t.[dbid]),'Unknown') AS [DB Name],
ecp.objtype AS [Object Type],
t.[text] AS [Adhoc Batch or Object Call],
        SUBSTRING(t.[text], (qs.[statement_start_offset]/2) + 1,
        ((CASE qs.[statement_end_offset]
            WHEN -1 THEN DATALENGTH(t.[text]) ELSE qs.[statement_end_offset] END
                    - qs.[statement_start_offset])/2) + 1) AS [Executed Statement]
        , qs.[execution_count] AS [Counts]
        , qs.[total_worker_time] AS [Total Worker Time], (qs.[total_worker_time] /
qs.[execution_count]) AS [Avg Worker Time]
        , qs.[total_physical_reads] AS [Total Physical Reads],
(qs.[total_physical_reads] / qs.[execution_count]) AS [Avg Physical Reads]
        , qs.[total_logical_writes] AS [Total Logical Writes],
(qs.[total_logical_writes] / qs.[execution_count]) AS [Avg Logical Writes]
        , qs.[total_logical_reads] AS [Total Logical Reads],
(qs.[total_logical_reads] / qs.[execution_count]) AS [Avg Logical Reads]
        , qs.[total_clr_time] AS [Total CLR Time], (qs.[total_clr_time] /
qs.[execution_count]) AS [Avg CLR Time]
        , qs.[total_elapsed_time] AS [Total Elapsed Time], (qs.[total_elapsed_time]
/ qs.[execution_count]) AS [Avg Elapsed Time]
        , qs.[last_execution_time] AS [Last Exec Time], qs.[creation_time] AS [Creation Time]
FROM sys.dm_exec_query_stats AS qs
    JOIN sys.dm_exec_cached_plans ecp ON qs.plan_handle = ecp.plan_handle
        CROSS APPLY sys.dm_exec_sql_text(qs.sql_handle) AS t
--    ORDER BY [Total Worker Time] DESC
--    ORDER BY [Total Physical Reads] DESC
--    ORDER BY [Total Logical Writes] DESC
--    ORDER BY [Total Logical Reads] DESC
--    ORDER BY [Total CLR Time] DESC
--    ORDER BY [Total Elapsed Time] DESC
        ORDER BY [Counts] DESC
The sys.dm_exec_query_stats DMV query contains aggregate performance statistics that are associated with each of the cached query plans in the SQL Server instance. This query easily enables you to order the results in several ways, depending on what type of resource usage you want to concentrate on. The key is to weigh the number of times that the statement was executed versus the average resource usage to better determine which statements would have the largest impact on performance if they were optimized better.

I will caution you not to put too much weight on the total elapsed time or on the overall duration of the statement because other factors, such as blocking, can influence the overall duration. But by using this query, you should be able to quickly identify the top offending statements in your system, and then prioritise the statements so that you can tune them as efficiently as possible.

4. Plan to reuse

If possible try and reuse query plans in queries. The following query can help identify:
SELECT b.[cacheobjtype], b.[objtype], b.[usecounts], a.[dbid], a.[objectid], b.[size_in_bytes], a.[text]
FROM sys.dm_exec_cached_plans as b
CROSS APPLY sys.dm_exec_sql_text (b.[plan_handle]) AS a
ORDER BY [usecounts] DESC


This query sorts all of the plans in the procedure cache in descending order of use counts. The use counts column is incremented every time that a plan is reused, and it lets us easily identify which plans have reuse. You can also order the plans by the text column to determine which statements have many similar entries that have a use count of one. This value indicates statements that you call often but that don't reuse the existing plan. After you've identified these statements, you can prioritise which parts of the application you must work on first to get the biggest bang for your buck in terms of plan reuse. Don’t underestimate how seriously a lack of plan reuse can affect performance as the transaction rate increases.

5. Monitor Index Usage
The sys.dm_db_index_operational_stats() DMF is a widely underutilized source of information. It can provide you valuable information about your index usage. By using this DMF, you can decipher all kinds of information to determine not only which indexes are used but also how they're used. For example, are you scanning the index or are you using seeks? This DMF will tell you. It will even tell you things such as the time elapsed for processes, such as latching and locking. Have you ever asked yourself, "Is this index being used?" or, "Which indexes am I using for a given table?" We've all asked these questions at one time or another. So you can use this DMF to get a handle on your index usage. 6. Separate Data and Log Files One of the most basic but often disregarded rules for good performance is to separate the data and the log files onto separate physical drive arrays whenever possible. This is especially true when you use DAS, but it also applies to a SAN. The key principle here is to separate the mostly random access of the data files from the sequential access that occurs by writing to the transaction logs. One aspect familiar to a SAN environment is that even though you're presented with different drive letters or LUNs, you can't be sure that these represent different physical drive arrays. Often, these apparent drives are carved from the same larger disk array, and this will defeat the intent of separating them in the first place. So make sure that you know what you're really getting when you ask for your storage on a SAN. You'll be amazed at how much difference this can make as the volume of your transactions increases. 7. Use separate Staging Databases People frequently import data into a table that is real but temporary in nature. Then, they proceed to manipulate the data by performing extensive updates to prepare it for one of the final production tables. The problem with this is that most production databases are in full recovery mode. This means that practically all activity is fully logged in the transaction log, and these operations can be expensive.
By using a separate staging database within the SQL Server instance that's in simple recovery mode, you can achieve several performance benefits. One is that you can often get a minimally logged load instead of a fully logged load. This can dramatically speed up the import process to begin with. With a minimally logged load, the amount of data that's logged to the transaction log is very small in relation to what it would be for a fully logged load, so you have a much lighter burden on the server as a whole.
8. Pay attention to log files and reduce auto grow
Too many people underestimate the importance of the transaction log file in relation to performance. The most common mistake people make is not leaving enough free space in the transaction log file for your normal operations to occur without forcing an auto-grow operation. Growing the log file can be extremely time-consuming. It can force any DML operations to wait until the growth is complete before the operation can proceed.
9. Change max Memory Limit
There have been improvements in the 64-bit versions of SQL Server regarding memory allocation and sharing with the OS and other applications, but I've yet to see where leaving the MAX Memory setting at the default is ideal in real life. Even though your host server might be dedicated to SQL Server, there are always other applications or parts of the OS that require memory from time to time or even all the time. Do yourself a favor and set the MAX memory setting to at least 1 to 2GB less than the total amount of memory on the server if this is a single instance. If you have multiple instances, or if you're in a multi-instance cluster, you also have to account for that. How much memory you leave depends on what else you have running and how much memory it requires to operate efficiently. But you can adjust this value up or down over time as you see fit.
10. Don't shrink Data Files Shrinking data files has been a general bad practice for a long time, and it can really impact performance in one of three ways. The shrinking can be very painful to begin with. But because it can cause a lot of fragmentation, your subsequent queries might suffer as a result. And if you don’t have Instant File Initialization turned on, the resultant growth later can also hinder performance and potentially cause timeouts. Although there are times when shrinking a file might be necessary, make sure that you know the impact before you try it. For more details, see Paul Randal's blog post "Why you should not shrink your data files." 11. Create a customised maintenance plan
Indexes become fragmented over time, which leads to performance degradation. Statistics become out-of-date, which leads to bad query plans and poor performance. I/O subsystems can get corrupted, and there's the ever-present need for backups.
You can tackle all these problems by having a comprehensive maintenance plan tailored for your databases. A customized plan is far better than a generic plan that doesn't adequately address your needs.
1. First download and the psexec.exe put into a folder on the server or local machine to SSIS. E.g. c:\PowerTools\PSEXEC.exe or \\ServerSharedetails\PowerTools\PSEXEC.exe
2. Test in command line on ssis/local to server:
C:\PowerTools\PsExec.exe \\SERVER "C:\FoldertoBat on server\Admin.bat"
3. If this does not work and get access denied. You need to run the following regdit on the QlikServer and then RESTART the Qlik Server: reg add HKLM\SOFTWARE\Microsoft\Windows\CurrentVersion\Policies\system /v LocalAccountTokenFilterPolicy /t REG_DWORD /d 1 /f
(
You can check this is set up by going to the following path in the registry HKLM\SOFTWARE\Microsoft\Windows\CurrentVersion\Policies\system\LocalAccountTokenFilterPolicy and setting it to 1
)
4. SSIS set up:
In SSIS create an execute process task and add an executable expression with the psxec tested command:
C:\PowerTools\PsExec.exe \\SERVER "C:\FoldertoBat on server\Admin.bat"
[Note: this will run under the SSIS account the job runs under so you should test with this account to make sure it has permissions to run psexec on the server with the batch files].
3 - Reg setting manual set up step if do not want to run the command line:
(
Remote UAC will block them from being able to do things like remote execution.
A quick way to test if this might be your issue:
Access the server via filesharing (\\YOURSERVER\C$); you should be able to login with your credentials.
Access the server via filesharing, but this time go to the admin share (\\YOURSERVERNAME\ADMIN$); this should fail. This is what we need to fix.
To get around this, you can make a registry change:
Open RegEdit on your remote server
Navigate to HKEY_LOCAL_MACHINE\SOFTWARE\Microsoft\Windows\CurrentVersion\Policies\System
Add a new DWORD value called LocalAccountTokenFilterPolicy